CSV file fields
When creating a CSV file, keep in mind that there is a set format the file needs to follow, which contains the following fields (all of which corresponds with the fields found in the marker edit box):
- Location Title – required
- Latitude – required
- Longitude – required
- Info Window Content – optional
- Link Title – optional
- Link – optional
- Link Color – optional; should be added as a HEX value
- Link Target – optional
- Marker Category – optional
- onClick Parameter – optional
We have created a number of template files which we refer to below – you can get them by downloading this zip file and unzipping it in a location of your choosing.
File setup
You can create a CSV file using Microsoft Excel, using the provided XLXS file included in the zip archive. It follows the same template, and as with the example above, we have three lines – two of which are valid, and one which is not.

Unfortunately however, Excel does not export the CSV correctly, which will lead to errors when uploading the CSV file. In order to prevent this from happening, we have provided a macro you can run in Excel which will format the CSV file properly – follow the steps below:
- With the Excel spreadsheet open press Alt + F11
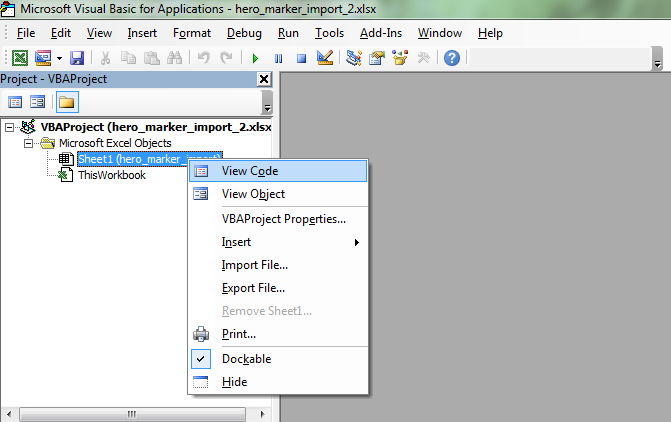
- This will open a window called Microsoft Visual Basic for Applications - Make sure to select the sheet with your entries, right-click it and select View Code

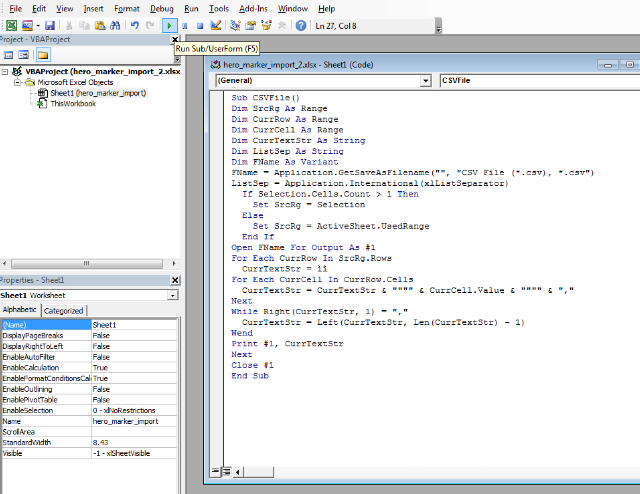
- Open the macro.txt file, copy the code and paste it into the code-view window in the VB Application – with that done, you can press F5, or click on the Play button to run the script.

- If the script runs successfully, you will be prompted to save your CSV file

Alternatively, you can make use of the macro-enable XLXS file provided in the zip archive – when opening this file you will very likely get a warning that Excel has disabled macros from running. Click the Enable Content button.
Once you have all your marker details added, press Alt-F11, and follow the same steps as above.